Winter Greenhouse projects 2015
 I needed something to relax me instead of tranquilizers. I thought to go sit in the solar greenhouse and contemplate new projects instead of using its original intended projected design as a seed starter and herbal repository I thought to double up and use vacant space to grow vegetables and more winter fare than basic greens like lettuce.
However, as we greenhouse lovers learn there is a specific amount of sunlight hours and sunlight brightness necessary to mimic summer conditions.
To start seedlings in the flats I have found that fluorescent T 90 lamps do wonders. You can suspend quad 37” bulbs over the flat, and with a heat mat have seedlings pop right up. You will recall the video I made on setting seed in a bottom watered flat, pressing the surface flat, making little groves for the seed and marking the seed with tongue depressors: plastic or wood, so you know what is in the tiny row.
When the tiny seedlings start their true leaves, (the first leaves are sun leaves) the roots are forming. We lift the tiny seedling out of the flat, and insert into a container of choice-first making a hole to drop the plant into and lightly squeezing the potting soil around it.
The small plant will continue to grow and you need to only adjust the fluorescent lamps a few inches above, but as the plant fills out you might set the lamp higher so it will stretch for the light. By the time the plant is six inches high; the lamp is about 12” above it. Time to move the plant.
Tomatoes are the most popular plant to start. The seedling slides out of the can, box plastic container, egg carton, or commercial growing starter flat. You will recall I encourage large containers such as dog food cans with a smooth lip-not the pop top cans with an inside ridge that breaks up the root structure when removing the root ball.
Currently I am starting squash seedlings and today was a tranquilizer for me-a tiny bit of green showing up in one of the larger commercial hard plastic 5” deep X 4” square cups. As I have found, squash is not keen on transplanting, but adapts well with a larger container. Inverting the container with the plant between your fingers, tap the bottom of the can and it slides out as a big root ball still encased in the potting soil.
Since this is January the predictions are for a grim winter (we had a trace of snow already), we have to consider the chill of the greenhouse. Even though I built a heavily insulated (6” thick foam -not batting) solar greenhouse the temperature at -15F below zero outside leaves the inside at about 40F with no artificial heat-just the 55 plastic gallon double stacked drums of water to hold and release warmth until the sunlight pours in and starts the cycle over again.
This lower end cycle is great for lettuces, collards, some cabbages, mustards, chards, green onions (like the wild garlic), plantains, early dandelion, and various wild adaptive edible plants, or just plants to see what grows and thrives in your care.
Currently I have an abundance of ivy donations, Aloe Vera, wild yam, golden seal, and basil, crowding my space. As all greenhouse growers lament “ we need a bigger greenhouse”.
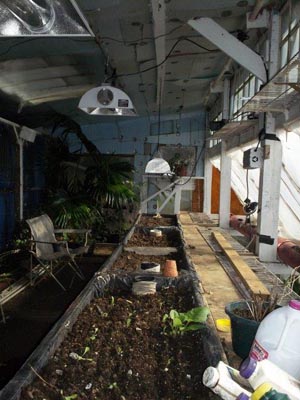
So I have elected to clean out the growing bed boxes and expand my growing area (I am slow) plus digging up the dirt floor which will expand my planting to about 160 square feet. Maybe I could start some of my 4’ corn? I have lots of garden fantasies it seems. But for sure I will need extra light and extra warmth for the summer growing plants to thrive.
Enter now the “Sun Systems”- Grow lights, beyond the fluorescent seed starter lights-real heavy-duty lights that exceed the sun’s summer light. They provide bright light and warmth for winter growing. I first tested a 250-watt grow lamp over some half dead squash that wanted to produce but just was not receiving enough light in the winter. The results are amazing and we have been gorging on squash for several weeks.
My next step was to illuminate the entire 160 square feet PLUS side light for vertical growing plants and the tomatoes grown in a PVC 10” 20’ tube. I will endeavor to show all this in time as plants grow. For now it is in the reconstruction-money phase.
I ordered two 1000-watt sun system lamps from Amazon.com of course. The digital lamps come with separate heavy external ballast that is adjustable from 400 watts to 1,100 watts and that really puts out the light. I suspended these big heavy lamps from the rafter beams on a 20 foot 1 inch pipe, right down the center of the floor/growing bed for maximum light coverage and maneuverability. I screwed big red half hooks into the oak rafters and slid the pipe into the hooks for a neat smooth holding. Once the pipe was up and straight I used scrap pieces of electrical #12 wire at each end, wrapped tight around the pipe to secure it to avoid sliding off the end hook support. Prior to sliding the pipe up on the hooks I slipped the up and down lamp rope hangers in place so that I could pull the lamps up or down onto whatever height I desired. Once these were connected I inserted the bulbs securely into the socket. Then I wiped off the fingerprints with a clean paper towel.
There was more to do. The lamps connect to the ballast; a heavy metal heat dissipating rectangular structure, and this is connected to 120VAC receptacle. But at this point I inserted between the ballast and receptacle a major surge protector. Each ballast was mounted to a substantial wood post, or a horizontal growing wood bar. I use treated wood metal screws. The ballasts are mounted long ways so that any dripping moisture does not enter the ends of the ballast and create an electrical short.
All connecting electrical fittings were taped securely to ensure dryness.
By this time I had invested three or more full days of planning, labors, finding tools, and a stepladder. No helpers.
The big moment arrived on a wet, dark, and dreary day. I turned on both surge protector switches and VOILA! It was summertime.
Summer indeed, once the January weather turns to below zero the heat produced by the lamps will boost the inside of the solar greenhouse temperature to ideal plant growth beyond lettuce production.
I had already removed the fluorescent quality T90 four bulbs –4-foot lamps- to the lower story of the two story solar greenhouse and threw out the two bulb 40-watt shop lamps. The 4 bulb T90 lamps do better for seed starting. These all require an inline surge protector, as everything today is going digital.
By the way, for my new endeavor this Friday, I am forking the dirt floor and bringing in several wheelbarrow loads of bunny poop to mix. The seed catalogs make for my evening reading.
Cost might be a consideration to run two 1000-watt lamps 24 hours a day. Fear not there are two solutions. (1) The price of electricity at this location is 11.9 cents a kilowatt-hour so at 2000 watts X 11.9 = $2.38 X how many hour days you allow using the two, less timer. The timer enclosed in the package allows you to automatically turn off the lamps in the daytime and they automatically come on at night. The timers(s) are plugged directly into the surge protector and the lamp to the timer. The surge protector has an on/off switch, or you can just disconnect the lamp wire directly. Always reset the timer. Now if you are growing all these plants in a basement, which many people do, it is a multiplication of 24 hours, unless you give the plants a couple hours rest. The next step is to multiply the daily wattage run X the number of billing days in the month.
If you are lost in the math and cost, a single hanging 1100-watt lamp run for 18 hours on a 30-day cycle will cost about $70.00. Consider that this lamp is adjustable from 400 to 1100 watts for different growing stages you will adjust and save accordingly. Also you can initiate the timer, and perhaps in the late spring through summer, maybe into fall, you can shut it off.
Wait there are more considerations about electricity: You must have enough electricity. I use a double breaker @ 40 amps. That is more than enough for later increases. I run 240 volts off the double breaker in the adjacent herb house to the greenhouse so that each leg of the wires carries 120 volts, which in turn the greenhouse is divided to a left and right side of greenhouse receptacles. You could run the lamps-ballast on 240 volts but it requires a modification. It is so much easier to just use 120 volts.
I have been working with electrical installation for over 60 years and for me it is simple. However if you have no experience I encourage you to seek professional assistance from a licensed electrician. Ensure that you have a good electrical ground system.
This might help! A list of products I researched for purchase from Amazon.com and Wal*Mart.
(1) The first smaller grow light kit# Sun System 9-00503 or,
(2) 250 watt Metal Haldide-18, 000 lumens. Spare bulbs- Sunlight Supply Inc.
(3) Grow light rope hangers with improved internal gears.
(4) VCT USP600 Power Strip with Surge at 3500 watts
(5) Virtual Sun USD 1,000 WattDS, Dimmable MH/HPS grow light with accessories: bulb, timer, and rope hangers-less quality than above. Ballast adjustable 400-1100 watts.
(6) Plastic 19” tool box from Wal*Mart for extra bulb storage.
(7) Red Hardware plastic covered hooks (Wal*Mart). Pipe-your choice. My 20-foot length pipe was left over from the chain link fence-schedule #40. 1”.
(8). I did not like the enclosed timer(s) so ordered two heavy duty outside lawn cover, water protected timers from Amazon. I was already using this timer from Wal*Mart for some years for seed starting.
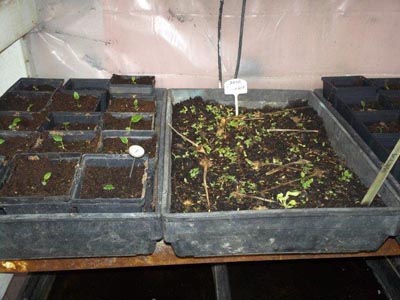
These pictures are my initial seedlings under the florescent 4 bulb lamps plus heat mats for better seed/plant starting. I am increasing my Echinacea plants for making tinctures this coming year. Note that the flat for Echinacea seed starting is a scattering of seed and you lift the little plants accordingly into separate containers, or plant them directly into the Solar Green House beds.
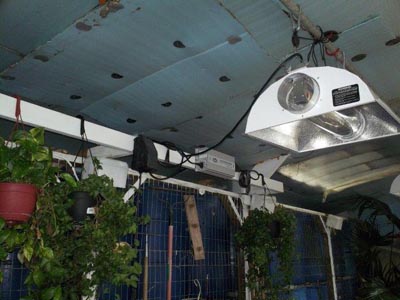
This is a snap shot of the BIG grow lights. These have an 8-foot spread of light to cover my dirt floor new growing area, plus vertical growing. Being patient after 17 years of Solar Greenhouse adventures it may take a bit more time than I can imagine. Stay tuned.
My goal is sending you this article on greenhouse growing is that you can do it too. Think of it as enjoyable prepping and saving on extended gardening, starting plants, growing herbs. Inflation with food costs prevails.
God Bless us all.
Old Timer.
COPYRIGHT: Back2theLand.com. All rights reserved, 1/26/2015.


